Thursday, November 29, 2012

One lazy susan table = Two ottomans!

I bought this lazy susan table last year and it's been in my garage ever since...
Totally cool function, 
but ugly colonial maple style.  

 I struggled with it for awhile.  
First I undercoated it.........
 Then I decided on a light blue and white distressed layered paint finish....
Then an idea sprung:  
I'd been looking for a large round ottoman for a client.......
I separated the "lazy susan" top, added casters to the bottom...
Here it is before upholstering....
 And here it is after. 
 After covering the wood with layers of batting, 
I used a quilt to reupholster, and then added nailheads along the top edge.
But wait, there's more!!! 
The base!
I added foam, 
and then used a cotton printed rug 
from Marshalls for the fabric.
It's very durable.....
Two in one!
Now THAT was fun;)

Tuesday, November 27, 2012

Fabric covered Desk

Furniture rehabs don't always have to be just about paint...
Take this little desk, for instance.
Nothing special....yet....
 It was just a plain, pine desk that had a coat of shellac........
Instead of painting, I decided to cover the drawer fronts in fabric.
This cotton duck was purchased at Hobby Lobby and is the perfect weight.
I simply glued the fabric to the fronts 
and then trimmed and glued/stapled the edges to the inside lip.
Next I added some cast iron "sun" knobs that I painted in a happy yellow.
Flowers and sunshine - the perfect combo.
I left the top and sides natural.
I painted a little chair in a smokey pale blue, 
and it's the perfect little study area for a young girl!
 As far as I know, it's still available in my Greenwood booth. $185/desk; $45/chair.
And this weekend, everything is 10% off!
One of a kind....
would look great under the Christmas tree!


Monday, November 26, 2012

Schumacher Houndstooth Chair Makeover

Hoping all of you had a blessed Thanksgiving holiday.
I did.....
Now it's back to work.  
Right before the holidays, I had lunch with my friend/client, Jeannie.
We both love antiquing and thrifting. 
(She had a little shop for years called "Meant to Bee" out on Patterson near the 288 interchange.)
We lunched and then hit the new Boaz and Ruth consignment store in Carytown...
and I found this:
 Amazing old wooden chair frame....
 Original casters........look at those legs!
Back detail.......
Unfortunately, it had no back or seat.........
just a million tacks.....
They gave me a deal I couldn't refuse, 
even though I knew it would be a lot of work..
 And it was..
First I removed all the tacks......
then I did a small repair and spot sanded.
 Next I cut out a seat from plywood to fit.
You know me, I LOVE to paint furniture. 
And this one would have been a beaut.
 But I decided to keep the gorgeous dark wood on this chair.
So I applied a light coat of Jacobean stain...
 I rebuilt the back, seat and arms with foam, webbing, and batting, and used this
Schumacher houndstooth fabric in a chocolate to recover.
 I added trim around all the edges of the upholstery.

 And you know me, I always like to add a surprise. 
So for the back, 
I used this fabric sample I've been saving for just the right project.
 It is a fabulous chair, if I say so myself.  
I didn't even get it to the booth before it sold.
For the rest of this week, 
I'll be busy preparing for our open house at 
Saturday, December 1st.
10AM-5PM
Hope you can make it.
Everything will be 10% off...
Lots of one-of-a-kind treasures.
Tis the season to shop!

Tuesday, November 20, 2012

Ugly chimney cabinet becomes primitive piece..

So on Saturday, I treated myself to a little thrifting.
Hit a couple of shops in Lakeside.
One of them, Pass It On, yielded this piece:
Okay, yes, it's ugly. Glossy pine...

 With decorative handpainted roses....eewwww....on the door...
....top and bottom....
...and shiny brass pulls...

 The first thing I did was separate the two pieces. 
 (I HATE anything I can't move around easily.)
 After adding peel and stick letters to each of the shelves, 
I painted the interior in a custom combo of Annie Sloan chalk paint.
Then I removed the letters to reveal the wood beneath.
Each of the shelves has a word:
Stuff
Junk
Things
Other
 Next I tacked the exteriors.  
I used a variety of chalk paint
colors and layers to build up the look of time-worn paint.
 After everything dried, I distressed and added stain layers
 of Jacobean and Weathered Oak.
 I elected not to put the door back. 
Besides, I can use it later for a headboard or something...
 Looks pretty great...

Heading to my booth....$185.
Happy Thanksgiving everyone!!

Friday, November 16, 2012

Artistry in a Kitchen: A George Costanza Project!

I recently pulled a George Costanza.
You know, the OPPOSITE...of what I normally do..
So here's the story..

This beautiful kitchen was designed by Lenora McPerson-Cole 
of Better Kitchens & Bath.
She asked me to help with a small project for her client, Jarrod.
So let's take a tour of the kitchen:
I love this kitchen because it's rare 
that you see one that utilizes a mixture of metals like this.
The kitchen has brand new wood cabinetry with brushed satin bar pulls...
Stainless steel appliances...
And copper!! 
I LOVE copper....
Check out this hammered copper farm sink....
Copper faucet...
The island top is covered with copper as well...
It all works beautifully because all the tones 
appear in the metallic glass tile backsplash.
It's all very sparkly and polished, 
but warm and inviting as well.
Nice job, Lenora and Jarrod!
So have you figured out yet 
what my little part was in all this was?
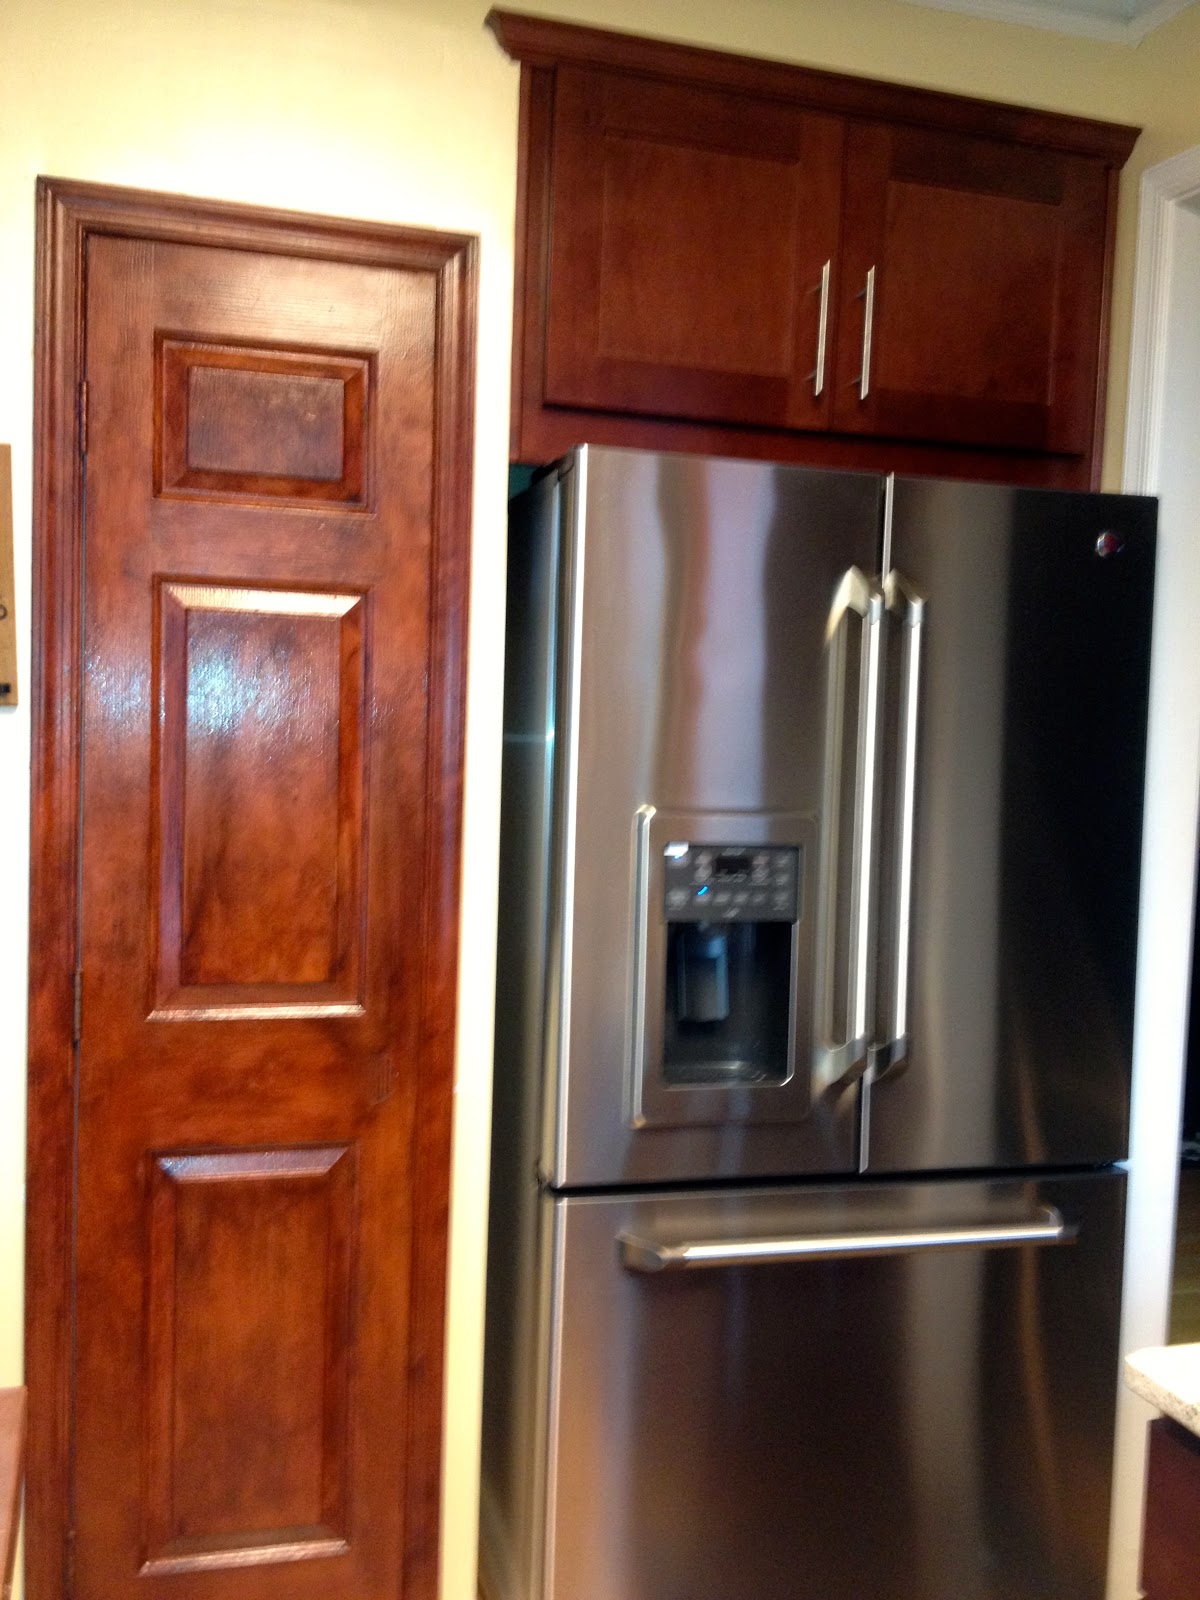
It's the pantry door and moulding...
Which began like this.....
Because the client didn't want the added expense 
of a new custom door and moulding, 
Lenora asked me to faux paint them to match the cabinetry.
I began by base priming in Glidden Gripper. 
Then I undercoated everything with two colors of Annie Sloane Chalk Paint:  
Old Barcelona and Scandinavian Pink
After drying, I began the magic......
I used a variety of stains in Red Oak, Cherry, and Dark Walnut, 
to simulate wood.
Here's the staining  in progress.
 And here's the finish.
Pretty amazing, heh?


It's been a while since I've done this...
My usual assignment is taking old wooden cabinets and painting them lighter.
Here's a similar project I did - but on a much larger scale.
The kitchen began all white on white.
I painted all the cabinets to simulate new cabinetry the client had ordered.
No, it's not one of my all time favorite projects to tackle, 
because it's stinky and messy and time consuming.

But what can I say??
I love a challenge!!!!